이번 글에서는 원격 저장소(github 등)에서 브랜치를 만들고 합치면서 협업하는 법에 대해서 다뤄보려고 한다.
원격 저장소에서 브랜치 생성
이전 글(git branch 정리 – 예삼의 개발일기)에서는 브랜치를 로컬에서 생성하는 법에 대해 다뤘는데, github에서도 브랜치를 생성할 수 있다.
![[git] pull request](https://yesam.kr/wp-content/uploads/2024/05/image-10-1024x625.png "[git] pull request 1")
![[git] pull request](https://yesam.kr/wp-content/uploads/2024/05/image-11-1024x411.png "[git] pull request 2")
![[git] pull request](https://yesam.kr/wp-content/uploads/2024/05/image-12-1024x430.png "[git] pull request 3")
근데, 난 그냥 로컬에서 git branch <브랜치명>으로 브랜치 생성하거나, git switch -c <브랜치명>으로 생성 후 이동하는 것이 더 편한 것 같다.
pull request
브랜치에서 작업을 완료한 후 변경사항을 메인 브랜치에 병합merge를 해야 한다. 그런데, 사람들과 협업할 때는 이전 글(git merge 4가지 방법 정리)처럼 로컬에서 merge를 하는 것보다는 원격저장소(깃헙)에서 pull request를 통해 merge를 한다고 한다.
merge할 때는 conflict가 발생할 수도 있고 메인 브랜치가 변화하는 것이기 때문에 사람들과 함께 의논해서 merge를 해야한다. 이 과정을 원격 저장소에서 편리하게 할 수 있는 방법이 있는데, 바로 pull request다.
pull request(PR)란, 말 자체는 pull을 해달라는 request(요청)인데, 내가 원격 저장소에 내가 만든 브랜치를 push했으니, 확인하고 merge해 주세요! 라는 뜻이다. (근데 보통 fork를 만들어서 하는 거 같은데 이후 배워서 정리해보겠다)
[1] 원격 저장소 클론
$ git clone <원격 저장소 주소>
[2] 브랜치 생성, 커밋, push
$ git switch -c <내가 사용할 브랜치 명> : 브랜치 생성 및 이동
$ git add . : 변경 사항 만들고 add하기
$ git commit -m <커밋명>

$ git push origin <방금 만든 브랜치 명>
origin은 clone 받게 됐을 때 기본으로 정해지는 원격 저장소 변수명이다. 그리고 push할 때는 모든 브랜치를 push하기 보다는, 내가 작업한 브랜치만 push하는 게 좋다고 한다. (다른 브랜치까지 나중에 검토할 일 없도록)
[3] pull request
![[git] pull request](https://yesam.kr/wp-content/uploads/2024/05/image-14-1024x449.png "[git] pull request 4")
깃헙 레포지토리를 가서 위에 Pull request를 누르면 New pull request 버튼이 있다. 아니면 바로 그 위에 있는 버튼인 compare & pull request 버튼(push한 직후에 나오는 좀 더 간소화된 버전)을 눌러도 된다.
![[git] pull request](https://yesam.kr/wp-content/uploads/2024/05/image-15-1024x495.png "[git] pull request 5")
compare는 내가 합치려고 올린 브랜치를 선택하면 된다. 그리고 Create pull request를 누르자.
![[git] pull request](https://yesam.kr/wp-content/uploads/2024/05/image-17-1024x534.png "[git] pull request 6")
추가 설명을 하고 싶다면 추가 설명을 적고, 밑에 Create pull request를 누르자. 이제 다른 사람들이 댓글도 달 수 있고, conflict도 해결할 수 있다.
[4] resolve conflicts
![[git] pull request](https://yesam.kr/wp-content/uploads/2024/05/image-18-1024x654.png "[git] pull request 7")
conflict가 생겼다면 이렇게 conflict를 없앨 수 있다.
![[git] pull request](https://yesam.kr/wp-content/uploads/2024/05/image-20-1024x410.png "[git] pull request 8")
코드를 수정한 후, Mark as resolved를 누르면 Commit merge라는 버튼이 생긴다. 그걸 클릭하면 된다.
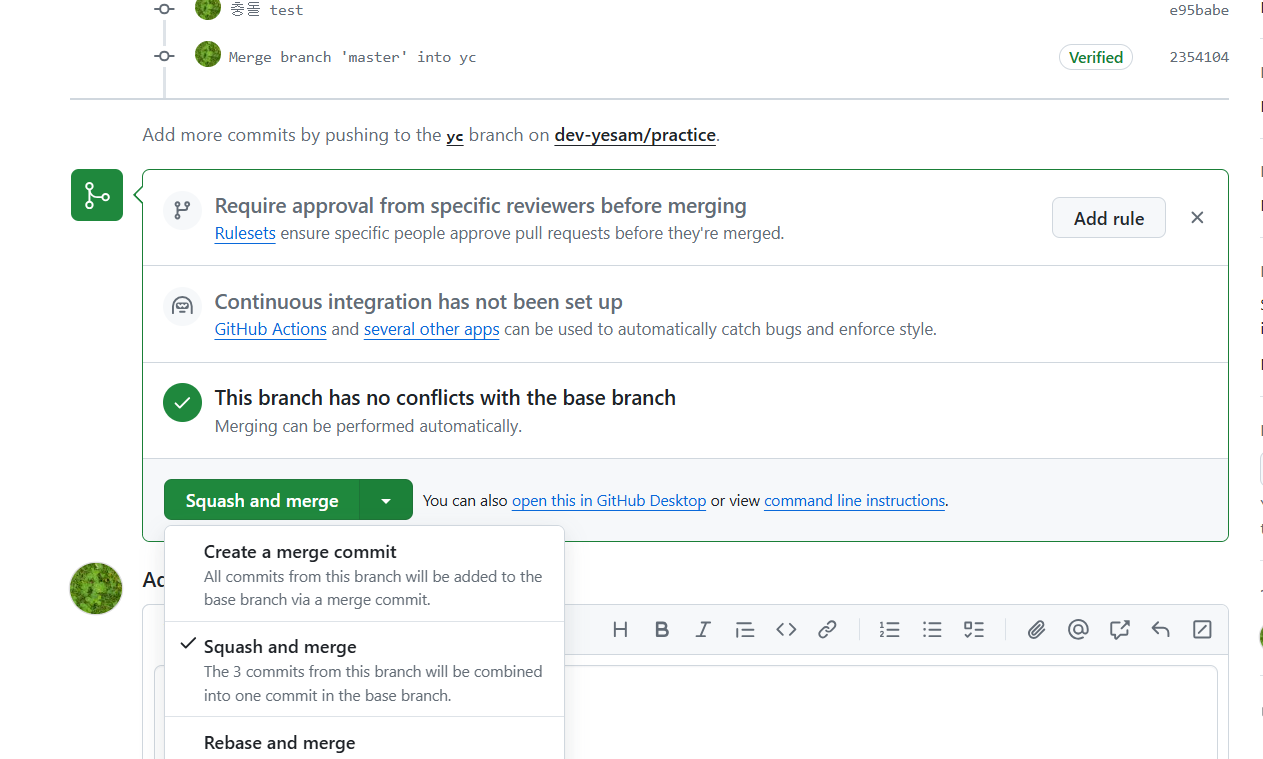
[5] merge 하기
![[git] pull request](https://yesam.kr/wp-content/uploads/2024/05/image-21-1024x615.png "[git] pull request 9")
merge는 3가지 방식으로 할 수 있다. 이전 글(git merge 4가지 방법 정리 – 예삼의 개발일기)에서 다루었던 merge 방법들이다. 원하는 걸로 골라서 merge하면 끝이다.
No Responses